
Back to blog
Simple PCB Soldering
Soldering, especially when working with PCBs, is a fundamental skill in the realm of electronics. This skill enables the creation of durable connections between electronic components, serving as the cornerstone of circuitry. Whether you’re a novice or an experienced enthusiast, mastering PCB soldering opens up a world of precision and possibilities in your electronic projects. In this comprehensive guide, we will delve into the intricacies of PCB soldering, equipping you with the knowledge and expertise required for precise and confident soldering.
Step 1:Materials Gathering for PCB Soldering
Before embarking on the art of PCB soldering, it’s essential to gather the necessary materials and tools for this endeavor. At the core of your soldering toolkit is the soldering iron, and understanding its components is crucial:
- Soldering Iron Tips: These tips play a pivotal role in heating up and facilitating the flow of solder between joined components. It’s important to note that tips transfer heat, not solder directly. Tips come in various sizes and shapes to accommodate different components.
- Soldering Iron Wand: The wand serves as the handle of the soldering iron, insulating against the heat generated by the tip. Inside the wand, wires and metal contacts efficiently transfer heat from the base or outlet to the tip, ensuring safe and effective heat transfer.
- Solder Wick (Desoldering Braid): Solder wick, also known as desoldering braid, is a valuable tool for tasks like desoldering and removing excess solder. It consists of thin copper wires braided together, allowing it to wick up excess solder with precision.
- Solder Vacuum (Solder Sucker): The solder vacuum, commonly referred to as a solder sucker, simplifies the removal of residual solder from through-holes when desoldering components. This tool streamlines the process of rectifying mistakes or making modifications on your PCBs.
Step 2:Preparing for PCB Soldering
With your materials in place, it’s time to prepare the soldering iron for action. A critical part of this preparation is “tinning” the soldering tip, which involves coating the tip with a thin layer of solder to enhance heat transfer and create a base for solder to flow from.
- Warm Up The Iron: Ensure your soldering iron reaches the required temperature before starting, especially if it’s a new iron that may have a protective coating.
- Workspace Setup: Create a suitable workspace for soldering, ideally equipped with a soldering iron stand or holder. Place a damp sponge within easy reach for cleaning the tip between soldering joints, and use a piece of cardboard beneath your work area to catch any drips.
- Coat The Tip In Solder: Apply a generous amount of solder to the tip, covering the entire surface. Expect some solder to drip during this process, as it ensures thorough tip coverage.
- Clean The Soldering Tip: Immediately wipe the tip on the damp sponge to remove any flux residue. This prevents the flux from drying out and solidifying, ensuring optimal heat transfer.
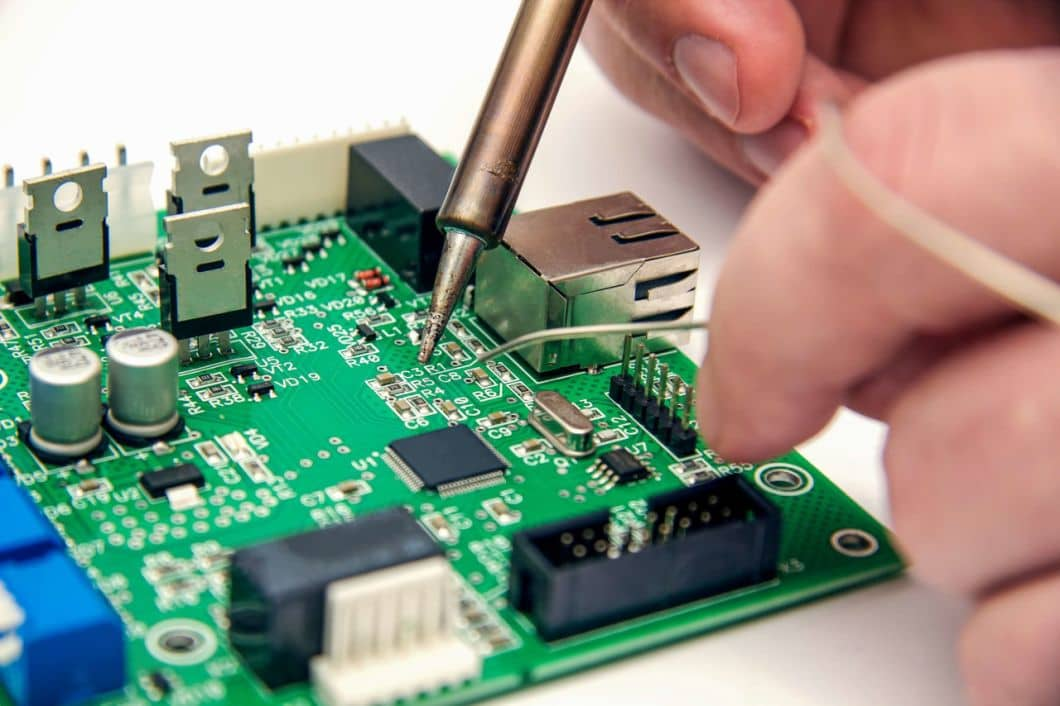
Soldering a PCB Soldering a PCB is a meticulous process that demands attention to detail. Here are the steps involved:
- Surface Preparation: Begin by ensuring a clean surface for strong, low-resistance solder joints. Follow these steps:
- Clean the PCB Surface: Use industrial-grade 3M Scotch Brite pads to remove surface tarnish without abrading the PCB material.
- Use Solvent for Stubborn Deposits: If the board has stubborn deposits, consider using a solvent like acetone or methyl hydrate to clean the PCB surface. Be cautious when using steel wool on boards with tight tolerances to avoid issues between pads and holes.
- Compressed Air: After cleaning, use compressed air to remove debris from the holes and ensure the board is dry and free from contaminants.
- Component Placement: Place components on the PCB in a strategic manner:
- Begin with Small Components: Start with the smallest and flattest components, such as resistors, ICs, and signal diodes. Progress to larger components as you work through the assembly.
- Strategic Component Placement: Avoid placing all components at once; instead, solder a few components, then add more. This incremental approach helps maintain board stability during soldering.
- Handle Sensitive Components with Care: Install components like MOSFETs and non-socketed ICs last to minimize the risk of damage during assembly.
- Bend and Insert Leads: Bend component leads as needed and insert them through the appropriate holes on the PCB, considering a 45-degree angle on the underside for stability.
- Applying Heat and Solder: Achieve proper solder joints through precise application of heat and solder:
- Apply a Small Amount of Solder to the Iron Tip: Before soldering, add a small amount of solder to the tip of your soldering iron to aid heat conduction.
- Heat the Joint: Position the iron tip to contact both the component lead and the PCB pad, ensuring proper heating for successful soldering.
- Apply Solder to the Joint: Gently touch the solder strand’s tip to the component lead and solder pad, not the iron tip itself. If the components are hot enough, solder should flow smoothly, with flux melting and bubbling as it cleans the joint.
- Continue Soldering: Add solder until the pad is fully coated, forming a small mound with slightly concave sides. Avoid excessive solder use and remove the iron before moving the joint, allowing the solder to cool and solidify.
- Inspect and Clean Up: After soldering, inspect and clean up for high-quality solder joints:
- Carefully examine the solder joints for cold joints, shorts, or poor flow, which can often be fixed by reheating and applying a small amount of solder.
- Trim excess component leads at the top of the solder joints using side cutters.
- To prevent flux residue accumulation, thoroughly clean the board. Most fluxes can be removed with methyl hydrate and a rag, but stronger solvents may be necessary for stubborn residues. Finish by blowing the board dry with compressed air.
Step 3:Tips and Tricks for Successful Soldering
Soldering is a skill that improves with practice, and these tips will help you achieve success:
- Use Heatsinks, especially for sensitive components like ICs and transistors. In the absence of clip-on heatsinks, pliers can serve as a substitute.
- Keep the Iron Tip Clean to promote better heat conduction and quality joints. Use a wet sponge to clean the tip between soldering joints and maintain proper tinning.
- Double-Check Joints, especially when working on complex circuits. Verify solder joints after completing them through visual inspection and resistance testing to identify any issues.
- Solder Small Parts First, beginning with smaller components like resistors, jumper leads, and diodes before moving on to larger components like capacitors and transistors. This sequential approach simplifies the assembly process.
- Install Sensitive Components Last, placing MOSFETs, non-socketed ICs, and other sensitive components towards the end to minimize the risk of damage during assembly.
- Ensure Adequate Ventilation, as most soldering fluxes release fumes that should not be inhaled. Work in a well-ventilated area or use proper fume extraction equipment to maintain a safe environment.
Step 4:Soldering Safety
While soldering is generally safe, it involves high temperatures and potentially harmful fumes. Here are some safety precautions to keep in mind:
- Use a soldering iron stand to support the iron when not in use.
- Keep the soldering iron cord away from high-traffic areas to prevent accidents.
- Be cautious of solder drips and avoid soldering over exposed body parts.
- Work in a well-lit area with ample space to lay out components and move around.
- Avoid breathing fumes directly; ensure proper ventilation to disperse fumes.
- Wash your hands before eating, as solder may contain lead.
- Refrain from touching your face while working with solder to prevent contamination.
Conclusion
In PCB soldering, attention to detail is paramount, ensuring proper surface preparation, strategic component placement, precise application of heat and solder, and thorough inspection and cleanup after soldering. By following the correct steps and techniques, you can create robust and reliable soldered connections, ensuring the smooth operation of your electronic projects. Additionally, keeping soldering safety in mind is crucial to maintain a safe working environment, prevent injuries, and avoid inhaling harmful fumes. With continuous practice and experience, you can continuously improve your PCB soldering skills, providing a solid foundation for future electronic creations.
PCB & PCBA quick quote
Related Articles
Key Considerations in High-Frequency RF Board Design
RF BoardsIntroduction In today's rapidly advancing world of electronics, RF boards and microwave PCBs are pivotal in driving innovation. These specialized components underpin a plethora of cutting-edge technologies, from 5G networks and satellite communications to...
Analysis of Power Supply Noise in HF PCB Design Process
Power Supply PCB Design Partial FilesIn the realm of high-frequency PCB design, effective management of power supply noise is crucial to maintaining optimal system performance. As electronic devices evolve with higher clock speeds and increased component density, the...
What is EMI, EMS and EMC?
EMC TestElectromagnetic compatibility (EMC) is a critical consideration in the design and manufacturing of electronic devices, especially on PCBs. This article aims to delve into the concepts of Electromagnetic Interference (EMI), Electromagnetic Susceptibility (EMS),...
Take a Quick Quote