
DC-DC Converter PCB Design Guide – From 5W to 5kW Solutions

Designing a DC‑DC converter PCB that behaves in the lab is straightforward. Engineering one that survives automotive transients, passes stringent EMI limits, and holds efficiency across wide temperature swings demands disciplined layout, material choices, and validation. Drawing on thousands of 5W–5kW converter boards we have fabricated and assembled across diverse applications, this guide distills what consistently works—from prototype DFM reviews and component sourcing to test fixtures, functional screening, and scaling to volume.
Choosing the Right Topology for Your DC-DC Converter PCB
Buck converters dominate for step-down applications, but topology selection impacts everything from component count to PCB complexity. Simple non-synchronous buck converter PCBs work fine below 2A, but synchronous rectification becomes essential for higher currents.
Real-world topology selection criteria:
- Buck converter PCB: Best for Vout < 0.8×Vin, efficiency peaks at 50% duty cycle
- Boost converter PCB: Struggles above 10:1 step-up ratio, consider two-stage
- Buck-boost converter PCB: Necessary for battery applications with wide voltage swings
- SEPIC converter PCB: Handles step-up/down without polarity inversion
- Flyback converter PCB: Ideal for isolated low-power DC-DC converter PCB designs under 100W
For a recent DC-DC Converter PCB project requiring 5V to 48V conversion, we chose a two-stage boost topology over a single-stage design, improving efficiency from 82% to 91% while reducing component stress.
PCB Material Selection for Different Power Levels
Standard FR-4 handles most DC-DC converter PCB applications, but specialized materials excel in specific cases. High-frequency GaN-based converters benefit from low-loss PCB laminate materials like Rogers RO4350B, reducing dielectric losses above 1MHz.
For high-power automotive DC-DC converter PCBs, consider thermally enhanced FR-4 variants. They cost 30% more but improve thermal performance by 50%. Metal-core PCBs make sense above 100W/inch² power density, though they complicate PCB assembly and increase cost significantly.
Practical EMI Solutions That Actually Work
Every DC-DC converter PCB generates EMI, but smart design minimizes it without expensive filters. Start with proper input capacitor selection—use X7R ceramics for high-frequency bypass, not just bulk electrolytics. Place them to create the smallest possible current loops.
Shield critical signals between ground planes. For Power Converter PCB designs switching above 200kHz, add RC snubbers across catch diodes to dampen ringing. Size snubbers empirically—calculated values rarely match optimal real-world performance.
Common-mode chokes work miracles for conducted emissions but need proper implementation. Wind them yourself for prototypes, but use manufactured parts for production to ensure consistency.
Component Derating for Long-Term Reliability
Datasheets show maximum ratings, not recommended operating conditions. For 10-year reliability in DC-DC converter PCB applications, aggressive derating is essential:
- Capacitors: 50% voltage derating, 20°C temperature margin
- MOSFETs: 60% current derating, 80% voltage derating
- Inductors: 70% saturation current at maximum temperature
- Diodes: 50% current rating for Schottky, 70% for ultrafast
A customer’s Switch Mode Power Supply PCB failed after two years due to capacitor wear-out. Proper derating would have extended life to 15+ years for minimal extra cost.

Multi-Output Challenges and Solutions
Multi-output DC-DC converter PCBs face cross-regulation challenges. Weighted feedback improves regulation but compromises individual output accuracy. Independent post-regulators add cost and reduce efficiency.
The practical solution? Use coupled inductors for outputs with similar current profiles. Add linear regulators only for low-current auxiliary supplies. For Power Electronics PCB designs requiring ±15V gate drive supplies, a simple coupled-inductor flyback provides adequate regulation without complex feedback schemes.
Synchronization and Paralleling Techniques
Paralleling DC-DC converters increases power capability and redundancy. But without proper current sharing, one converter handles excessive load while others coast. Active current sharing using dedicated controllers works but adds complexity.
Our approach for Power Regulation PCB designs: Use droop current sharing with 3-5% load regulation. It’s simple, requires no communication between converters, and naturally balances current. For critical applications, add OR-ing diodes for redundancy despite the efficiency penalty.
Testing Beyond the Datasheet
Standard efficiency measurements don’t reveal design margins. Test at temperature extremes with worst-case component tolerances. Use electronic loads with current slew rates matching real applications—battery charger PCBs face different dynamics than LED driver PCBs.
Measure switching node waveforms with proper high-frequency probes. That 50V spike might be measurement error or a real problem. Pre-compliance EMI testing saves certification headaches. Even simple near-field probing identifies problem areas before formal testing.
For high-reliability applications, implement HALT (Highly Accelerated Life Testing). Temperature cycling, vibration, and combined stress testing reveal weakness conventional testing misses. Our electronic manufacturing service includes comprehensive testing protocols tailored to application requirements.
Transform your DC-DC converter concepts into reliable products with Highleap Electronics. Our PCB fabrication expertise ensures your designs transition smoothly from prototype to production.
FAQ on DC-DC Converter PCB Design
How do I choose the right switching frequency for my DC-DC converter PCB layout?
Selecting the optimal switching frequency is a critical trade-off. Higher frequencies (500kHz+) allow for smaller inductors and capacitors, reducing the overall DC-DC converter PCB size and BOM cost. However, this comes at the expense of increased switching losses, which can lower efficiency and exacerbate PCB thermal management and EMI challenges. For high-power DC-DC converter designs, a lower frequency (100-300kHz) is often preferable to maximize efficiency. Always consult your controller IC’s datasheet and use its evaluation board as a reference starting point.
What are the best practices for thermal vias placement in a high-power DC-DC converter PCB?
Effective use of thermal vias is essential for managing heat in power electronics PCB. Place them directly in the pad of surface-mount power components like MOSFETs and inductors, or in an array immediately under the component. For a 1oz copper PCB, use 0.3mm drill vias filled with thermal epoxy. The goal is to create a low-thermal-resistance path to inner ground planes or a dedicated thermal layer, which acts as a heat spreader. For automotive-grade DC-DC converter boards, a dense via array can reduce junction temperatures by 15-20°C, significantly improving long-term reliability.
Can I use automated routing tools for the power stage of my DC-DC converter PCB?
It is strongly discouraged to use auto-routing for critical power paths. The layout of a switch-mode power supply PCB is paramount to its performance. Autorouters prioritize connection completion over optimizing current loops and parasitic inductance. Manual PCB routing for DC-DC converters is essential to ensure: 1) The smallest possible high-frequency switching loops between the input capacitors, switching FETs, and inductor. 2) Adequate copper pour width for high-current paths to avoid excessive voltage drop and heating. 3) Proper placement of feedback networks away from noisy switching nodes to prevent instability.
What is the importance of loop inductance in a buck converter PCB design?
Minimizing loop inductance is arguably the most critical factor in achieving low noise and high efficiency in a buck converter PCB layout. High loop inductance in the switching node creates large voltage spikes (ringing) that can overstress MOSFETs, increase EMI, and lead to common failures in DC-DC converter circuits. The primary loop consists of the input capacitor, high-side MOSFET, and low-side MOSFET (or diode). This loop must be as physically small and tight as possible. Using a ground plane directly underneath the top layer power traces is the most effective method to minimize this parasitic inductance.

Related Articles
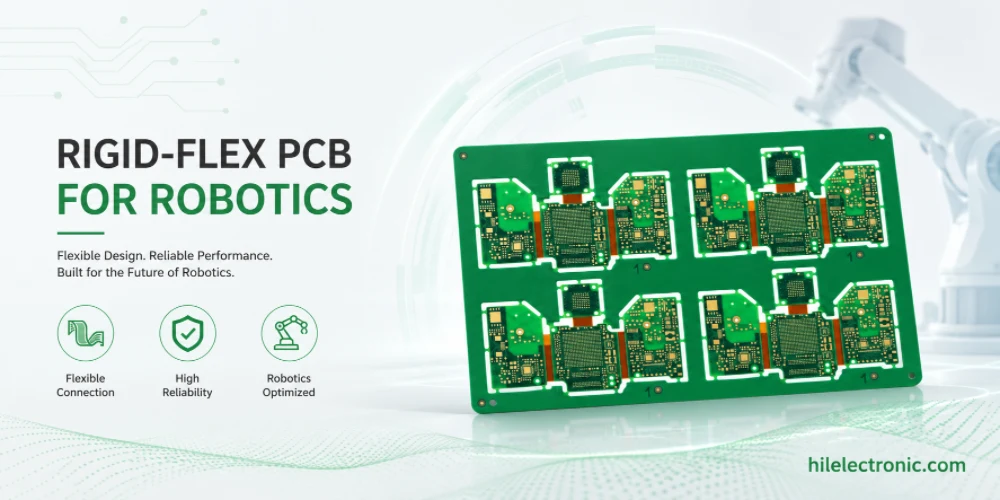
Rigid-Flex PCB for Robotics: Joint Interconnects That Survive Motion
Rigid-flex PCB manufacturing for robotics is valuable when...
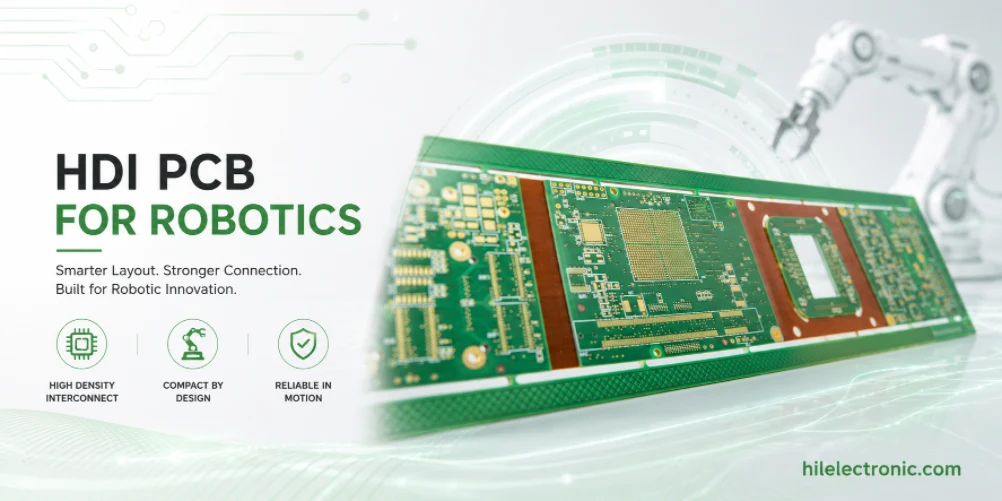
HDI PCB for Robotics: Microvias, BGA Fanout and Signal Integrity
HDI PCB manufacturing for robotics is driven by compact...

Drone and Aerial Robot PCB for Flight Control and ESC Reliability
Drone and aerial robot PCB manufacturing is shaped by...
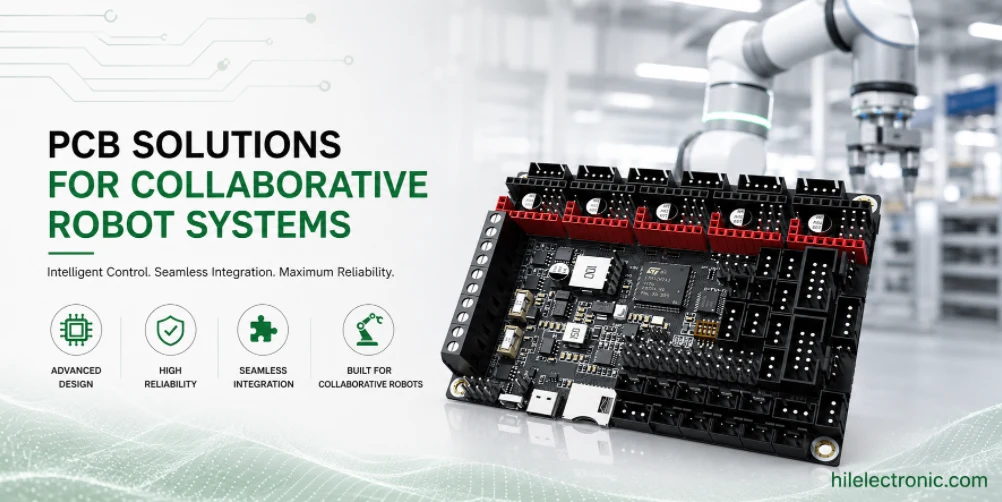
Collaborative Robot PCB for Cobot Safety and Joint Control
Collaborative robot PCBs support robots that operate near...
How to get a quote for PCBs
Let us run DFM/DFA analysis for you and get back to you with a report.
You can upload your files securely through our website.
We require the following information in order to give you a quote:
-
- Gerber, ODB++, or .pcb, spec.
- BOM list if you require assembly
- Quantity
- Turn time
In addition to PCB manufacturing, we offer a comprehensive range of electronic services, including PCB design, PCBA (Printed Circuit Board Assembly), and turnkey solutions. Whether you need help with prototyping, design verification, component sourcing, or mass production, we provide end-to-end support to ensure your project’s success. For PCBA services, please provide your BOM (Bill of Materials) and any specific assembly instructions. We also offer DFM/DFA analysis to optimize your designs for manufacturability and assembly, ensuring a smooth production process.